Dimensional accuracy and tolerances
To make the part achieve the expected performance is called precision. With the improvement of industrial technology level and the requirement of mass production mode, designers, assemblers and users have gradually strict requirements on the accuracy of machine parts. Therefore, the dimensions of each part on the design drawing must be clearly marked with tolerances specifications. The general specification allows manufacturers and inspectors to understand the range of qualified dimensions specified by the designer based on the drawing.
When designing, the designer must consider factors such as the manufacturing method, the operator’s technology, the machine performance, and the manufacturing cost when the parts are actually produced. The allowable dimensions fall within two limits, that is the tolerance. The smaller the tolerance, the higher the required performance and quality of the part. The cost might be higher.
Engineering fit
Fit refers to the tightness range of matched parts under various tolerance combinations.
It is usually divided into three types: interference fit, clearance fit and transition fit.

1. Interference fit
no gap between the shaft and the sleeve, or even the shaft is slightly larger than the hole of the sleeve. It needs to be driven in or pressed in, and the shaft cannot rotate in the sleeve.

2. Clearance fit
the shaft is slightly smaller than the hole of the sleeve, which can be easily assembled, and the shaft can easily rotate or slid, like pistons and valves.
3. Transition fit
It is between the above two. In theory, there may be fit with or without clearance, such as shaft key.
During the machining process, the deviation caused by the tool feed (like roundness, concentricity), thermal expansion and contraction caused by temperature changes, and the surface roughness of the hole and shaft will all affect the assembly and fit. In addition to the need to reserve space for the dimensions, the standard tolerances specifications are also set to clear requirements.
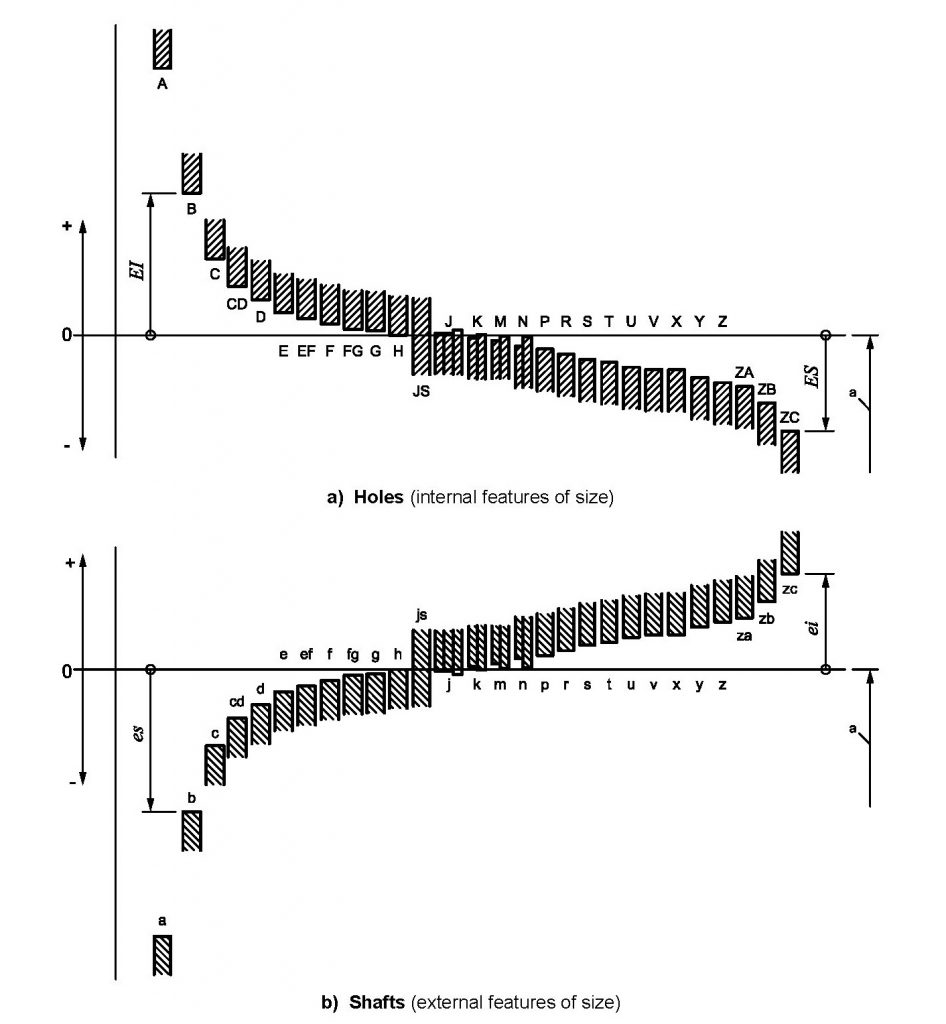
Generally, the relative tolerance between the hole and the shaft will be set according to the ISO 268-2 specification.
The tolerance for the hole will be one-sided negative tolerance (uppercase English letters and numbers). And the tolerance for the shaft will be one-sided positive tolerance (lowercase English letters + numbers). The English letters and numbers of the two tolerances will have a corresponding relationship. For instance, hole tolerance H7 with shaft tolerance h7. Setting the fit tolerance according to the demand is to achieve standardized control and precision production.

You can find the photo display of the CNC machining parts made by us HERE!

